Smarter Storage with LVM thin pools
A practical overview of LVM thin pools, explaining lazy allocation and how they solve traditional storage inefficiencies.
Published 31st Dec, 2025
If you’ve ever worked with LVMs, you eventually hit a frustrating paradox: the guest OS simply refuses to give storage to the place that needs it most, even when you clearly have free disk space. One logical volume (LV) is overflowing while another sits mostly empty, holding on to space it never needed.
This doesn’t necessarily mean Linux is bad at storage management, rather, it’s how traditional LVM allocates space. LVM thin pools came into existence to solve this very inefficiency.
How traditional LVM works?
In a classic LVM setup, storage is allocated eagerly. When you create an LV of 100 GB, the space is immediately reserved from the volume group (VG) in its entirety, it doesn’t matter whether you use all 100 GB or not. Even if you only plan to write 10 GB of data, the remaining 90 GB is locked away and unavailable to other LVs that might need it.
The design is predictable and safe to use, but also quite resource-wasteful. Over time, a single partition like /var can grow and cause logs to explode, whereas something like /home may remain mostly empty. Resizing LVs can become a manual and risky operation at times, especially on production-grade systems.
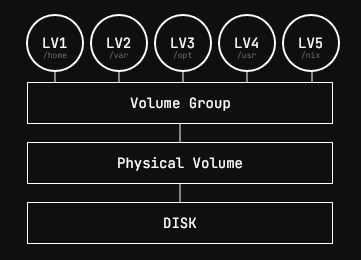
Traditional LVM setup with fixed size.
Traditional LVM treats storage as something you must divide perfectly upfront, leaving no room for error, even though real-world usage rarely follows the original plan.
The shift behind LVM thin pools
This implementation flips the storage model entirely. Instead of allocating space when an LV is created, thin pools allocate space only when data is actually written.
If you create a thin LV with a size of 100 GB, LVM does not immediately consume 100 GB from the disk. It simply acknowledges that the LV is allowed to grow up to that size if needed. Actual data blocks are assigned lazily as data is written.
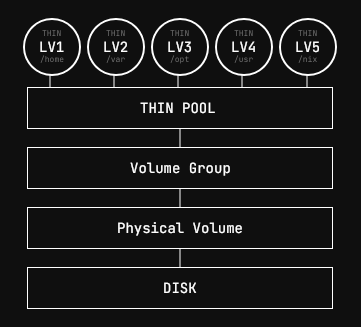
Thin LVM pool setup with lazy block allocation.
For a 5 year old, think of LVM like a chocolate box. In terms of thin LVMs, the box appears large and promises to hold “n” chocolates but it does not reserve space for the chocolates upfront. You are allowed to place chocolates of any size, in any order and the box would only consume space when a chocolate is added. Until then, the space is just a promise to let you know it’s available. It’s good but carries a risk, if you add too many chocolates it will simply overflow.
Traditional LVM is like a rigid box with predefined slots for exactly “n” chocolates of specific sizes. The space for each chocolate is reserved from the start whether you add a chocolate or not. This is a good and safer approach but not quite flexible if you want other chocolates too.
How do I create a thin pool?
Let’s assume you have a completely unused 300 GB disk attached to your system. This disk has no partitions, no filesystem, and no existing LVM configuration. The goal is to turn this raw disk into a VG and create a 100 GB thin pool from it.
LVM does not work directly on filesystems. It works on block devices.
- Create the physical volume on the disk.
pvcreate /dev/sdb- Create a VG named vg_thin.
vgcreate vg_thin /dev/sdbAt this point, the entire 300GB belongs to the vg_thin VG. No space has been allocated yet.
- Creating the thin pool inside the VG by intentionally allocating 100GB even though the VG contains 300GB.
lvcreate -L 100G --type thin-pool -n thinpool vg_thinThis command would create 2 partitions behind the scene, the thin pool itself and it’s metadata partitions. Together, these both manage allocation and book-keeping. The remaining unclaimed space from VG can be used for expansion or future pools.
- Creating a thin LV of size 150GB inside the pool.
lvcreate -V 150G --thin -n lv_data vg_thin/thinpoolYou might be wondering, how is the LV of size 150GB where-as the pool itself is of 100GB. That’s the entire point of having thin pools in the first place.
Logically, we are not allocating 150GB of disk blocks, instead we are declaring a maximum addressable space. So in simple terms “the volume is allowed to grow up to 150GB if space is available.”
- Format and use the thin LV.
mkfs.ext4 /dev/vg_thin/lv_data
mount /dev/vg_thin/lv_data /containers/immich
The final partition layout would look similar to something below.
> lsblk /dev/sdb
NAME                              MAJ:MIN RM   SIZE RO TYPE MOUNTPOINTS
sdb                                 8:16   0   300G  0 disk
├─vg_thin-thinpool_tmeta          252:6    0   100M  0 lvm
│ └─vg_thin-thinpool-tpool        252:8    0   100G  0 lvm
│   ├─vg_thin-thinpool            252:9    0   100G  1 lvm
│   ├─vg_thin-lv--lv_data         252:10   0   150G  0 lvm  /containers/immich
└─vg_thin-thinpool_tdata          252:7    0   100G  0 lvm
  └─vg_thin-thinpool-tpool        252:8    0   100G  0 lvm
    ├─vg_thin-thinpool            252:9    0   100G  1 lvm
│   ├─vg_thin-lv--lv_data         252:10   0   150G  0 lvm  /containers/immich
---------------------------------------------------------------------------------
As files are written t o /mnt/immich the blocks are allocated from the thin pool (vg_thin) gradually. This way you can add more thin LVs or even expand the thin pool later using the remaining space in the VG.
What happens if the pool runs out?
Thin pools give you the flexibility but it always come with a cost. If the total physical usage across all thin volumes reaches 100 GB, the pool is full. At this point, any further writes would simply fail, the filesystem by itself would mount as read-only and in worse case scenario data corruption becomes possible.
At present, all of my container data lives in thin LVs that were created as part of my setup, with adequate monitoring in place, of course. As long as you monitor your existing thin pools and the corresponding thin LVs, this setup remains one of the most efficient storage strategies Linux offers.
I’ll see you in the next one!
Comments
You can write to me at [email protected]. Email services are insecure, consider encrypting emails with my PGP Key if you're sending me something sensitive.
Loading comments